
SSL Certificate ราคาพิเศษลด 5% - 75% จากราคา Vendor Direct Pricing สั่งซื้อวันนี้รับส่วนลดเพิ่มอีก 5% - 10%
ฟรี เครื่องมือตรวจสอบ SSL Certificate สำหรับลูกค้าและผู้สนใจทั่วไป
Updated 20/09/2024 - ขอแนะนำ 2 บริการใหม่ SSL Live Search ค้นหา SSL Certificate ด้วยคีย์เวิร์ด
และ SSL Wizard ตัวช่วยในการเลือก SSL Certificate ให้เหมาะสมกับการใช้งานของท่าน
Home/Index
What is a HTTPS
Moving HTTP to HTTPS
SSL Wizard
CSR & Private Key Gen.
Certificate Key Matcher
SSL Converter
SSL Installation
SSL Install Checker 1
SSL Install Checker 2
Secure Site Seal
CSR Decoder
SSL Decoder
Why No Padlock
Expiry Monitor
CAA Record Gen.
HTTP Header Check
Website CP Checker
Approver Email Checker
Server Checker (Deep Analysis)
Check SSL/TLS Capabilities of Your Browser
SSL Live Search
Buy SSL Certificate
Domain Validation
วิธีติดตั้ง SSL Certificate บน Ubuntu

สิ่งที่ต้องเตรียมก่อนติดตั้ง SSL Certificate บน Ubuntu
ก่อนอื่นต้อง Generate CSR (Certificate Sign Request) และ Private Key ก่อน โดยคลิกเลือกเมนูนี้ ---> Generate CSR & Private Key
1. Copy CSR ที่ Gen ได้ Save as yourdomain.csr (เช่น siamecohost.csr)
2. Copy Private Key ที่ Gen ได้ Save as private.key
3. ส่ง CSR files ให้ ตัวแทนจำหน่าย SSL Certificate ที่ท่านสั่งซื้อ เพื่อนำไปออก SSL Certificate
ขั้นตอนการติดตั้ง SSL Certificate
เตรียมไฟล์ดังต่อไปนี้ให้พร้อม
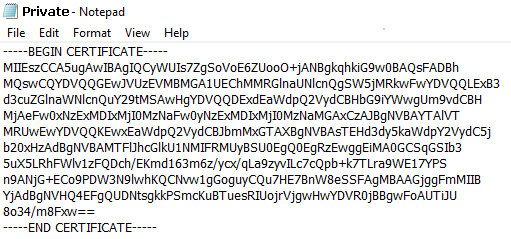
1. certificate file - public.crt (หรือ certificate.crt)
ให้ Copy certificate code จากในอีเมล์ที่ทาง ตัวแทนจำหน่าย SSL Certificate ที่ท่านสั่งซื้อ ส่งมาให้ จากนั้นไปวางใน Notepad แล้ว Save as public.crt

ไฟล์ที่ได้จากการ Generate CSR & Private Key

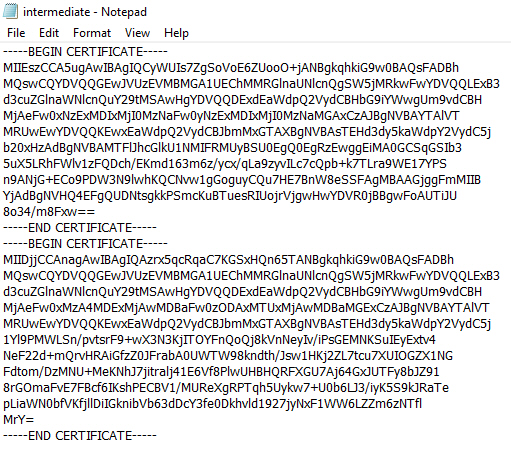
ให้เข้าไป Download intermedaite CA / Root จาก Link ในอีเมล์ที่ทาง ตัวแทนจำหน่าย SSL Certificate ที่ท่านสั่งซื้อ ส่งมาให้ ปกติจะมี 2 ไฟล์ เป็น IntermediateCA กับ RootCA เมื่อ Download มาแล้ว ให้เปิดไฟล์ด้วย Notepad Copy code จากนั้น copy code IntermediateCA กับ RootCA มาวางต่อกัน (ตามภาพ) จากนั้น Save as intermediate.crt

4. Upload / Transfer ทั้ง 3 ไฟล์ ขึ้นไปไว้บน Server ใน folder /etc/apache2/ssl ตามนี้
public.crt --> /etc/apache2/ssl/public.crt
private.key --> /etc/apache2/ssl/private.key
intermediate.crt --> /etc/apache2/ssl/intermediate.crt
Config files เพื่อรองรับการใช้งาน SSL Certificate
5. เปิดไฟล์ /etc/apache2/sites-enabled/default-ssl.conf บน Server
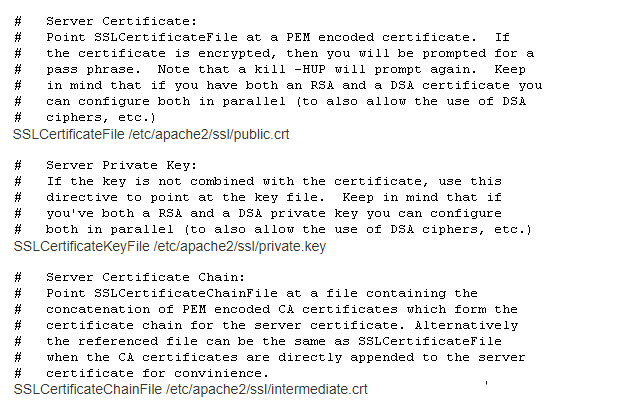
ใช้คำสั่ง vi /etc/apache2/sites-enabled/default-ssl.conf เพื่อเปิดไฟล์ แล้วแก้ไข 3 บรรทัดนี้ (วิธีใช้งาน vi editor เบื้องต้น - https://go.shr.lc/2GdFgSJ)
SSLCertificateFile /etc/apache2/ssl/public.crt
SSLCertificateKeyFile /etc/apache2/ssl/private.key
SSLCertificateChainFile /etc/apache2/ssl/intermediate.crt
ตัวอย่าง ไฟล์ default-ssl.conf

หมายเหตุ: Apache บาง Version ไม่รองรับ SSLCertificateChainFile ให้เปลี่ยนเป็น SSLCertificateFile แทน
6. เสร็จแล้วทำการ Save ไฟล์ default-ssl.conf (ถ้าแก้ไขไฟล์ด้วยโปรแกรม VI กดปุ่ม ESC แล้วพิมพ์ :qw)
7. พิมพ์คำสั่ง apachectl configtest เพื่อตรวจสอบว่ามี Error หรือไม่
-----------------------------------------------------------
ถ้าใช้คำสั่ง apachectl configtest แล้ว เจอ Error แบบนี้
AH00558: apache2: Could not reliably determine the server's fully qualified domain name, using 127.0.1.1. Set the 'ServerName' directive globally to suppress this message
-----------------------------------------------------------
วิธีแก้ไข สำหรับ Ubuntu v.13.04 and older
-----------------------------------------------------------
1. vi /etc/apache2/conf.d/fqdn.conf ตรวจสอบว่ามีไฟล์นี้หรือไม่ ถ้าเป็นไฟล์ว่างเปล่า ให้พิมพ์บรรทัดนี้เข้าไป
ServerName localhost
:wq
2. พิมพ์คำสั่ง sudo a2enconf fqdn.conf
3. พิมพ์คำสั่ง apachectl configtest เพื่อตรวจสอบว่ามี Error หรือไม่ ถ้าไม่มี Error ให้คำสัง apachectl stop / apachectl start ได้เลย
-----------------------------------------------------------
วิธีแก้ไข สำหรับ Ubuntu 13.10 or newer
-----------------------------------------------------------
1. vi /etc/apache2/conf-available/servername.conf ตรวจสอบว่ามีไฟล์นี้หรือไม่ ถ้าเป็นไฟล์ว่างเปล่า ให้พิมพ์บรรทัดนี้เข้าไป
ServerName localhost
:wq
2. พิมพ์คำสั่ง sudo a2enconf servername.conf
3. พิมพ์คำสั่ง apachectl configtest เพื่อตรวจสอบว่ามี Error หรือไม่ ถ้าไม่มีให้ sudo service apache2 reload หรือ sudo apache2ctl graceful ได้เลย
-----------------------------------------------------------
เพิ่มเติม: 19/04/2019
หลังสั่ง Restart Apache แล้วพบปัญหา Apache Start ไม่ขึ้น และ ใน Log file พบ Error ดังต่อไปนี้
[ssl:error] [pid 20311] AH02203: Init: Private key not found
[ssl:error] [pid 20311] SSL Library Error: error:0D07207B:asn1 encoding routines:ASN1_get_object:header too long
วิธีแก้ไข
1. ให้เปิดไฟล์ Private Key ด้วย Text Editor จากนั้นให้ Save as โดยเลือก Encode เป็น ANSI
2. Upload ไฟล์ Private Key ขึ้นไปไว้บน Server (ทับไฟล์เดิม)
3. สั่ง Restart Apache ใหม่อีกครั้ง
-----------------------------------------------------------
8. ทำการทดสอบโดยเข้าไปที่ https://yourdomain.com
9. ตรวจสอบการติตตั้ง SSL Certificate SSL Checker
SSL-Tools.In.Th Power by Siamecohost.Com
ขอแนะนำ SSL.Siamecohost.Ccm จำหน่าย SSL Certificate ใบรับรองความปลอดภัยอิเล็กทรอนิกส์ ราคาไม่แพง

